Epoxy Resin Guide

Table of contents
1. What is Epoxy Resin?
2. Characteristics of Epoxy Resin
3. Things to Consider Before Buying Resin
4. Different Methods of Processing Epoxy Resin
5. Starting Your Epoxy Resin Project
6. Setbacks You Can Encounter in Epoxy Resin Making
7. FAQs
What Is Epoxy Resin?
Resins are chemical compounds used in different fields and have multiple applications. One of the most common types is epoxy resin. Other types include polyester resin and polyurethane, among others.
Epoxy is usually used in the field of instruction. But lately, it is becoming popular in creating arts and crafts, especially the clear epoxy type.
Epoxy comes in two components: Component A (resin), and Component B (hardener). The mixing ratio between A and B differs from one brand to another, and it is usually mentioned on the container or in the technical data sheet. However, UV epoxy – which is a special type of epoxy – comes as one component and it hardens under the UV light.
Note: The mixing ratio is either by weight or by volume.
Characteristics of Epoxy Resin
The common characteristics associated with epoxy resin are:
1. High compressive strength, meaning that it can sustain heavy weights.
2. Good abrasion resistance, meaning that it can moderately sustain scratches.
3. Sticks well to many materials.
The below characteristics differ from one brand to another:
1. Transparency and clarity.
2. UV-stability.
3. Usage.
4. Resistance to heat.
5. Curing time.
6. Working time; meaning how many minutes you can work with the mixture before it hardens.
7. Work conditions such as room temperature.
Warning: Since epoxy resin is not fully UV-stable, it is not recommended to fully expose epoxy resin items to the sun for a long period of time.
Things to Consider Before Buying Resin
Before you buy epoxy resin, you need to know the following:

1. What application are you going to do.
Different applications require different types of epoxy. For example, some epoxy types that are used for jewelry will not work for solid slaps. Others are specified for certain thicknesses, meaning that if you are planning on pouring 10 cm of epoxy, you should choose a type that specifically states you can do so at one go, or you can choose a product that allows lesser thicknesses and you may finish your project over several pours. For certain creations such as coasters and tabletops, you must use heat resistant epoxy.
If you are planning on creating something that would be in contact with foods or drinks, you need to choose an epoxy resin that is approved for that purpose, such as the FDA approved one.
Tip: For tented projects, you can compromise on clarity and choose less expensive brands.
2. Technical requirements.
You should read and understand the technical aspects of the epoxy resin you are buying in order to assess if it will be suitable for you or not.
Tip: It is better to choose volatile-compound- (VOC) and solvent-free epoxy resin for safe use.
Different Methods of Processing Epoxy Resin
All epoxy resin creations require molding. For some projects, you will have to apply some processing techniques such as sanding, polishing, lathing, and drilling. Below is a brief explanation of each:
· Drilling

If you need to make holes in the epoxy resin for your project, you may do so by fixing inserts in the resin before it solidifies. Another option is to drill a hole, keeping in mind that the longer you leave epoxy, the harder it becomes. Drilling a hole can be made with any drilling machine available.
Tip: Tungsten carbide drills work better than others.
Tip: Make sure you don’t raise the temperature of the resin as you are drilling holes because it might leave burning marks. You can use water while drilling to reduce the temperature.
· Polishing
Polishing epoxy resin gives it a glossy, shiny finish. However, to start with, glossiness differs from one product to another. Polishing compounds, such as wax, can be used to enhance glossiness. If you are handling larger surfaces, you need to use a polishing machine that has a suitable pad.
· Sanding

In some applications, we end up with a rough surface that need to be smoothened. To do so, one used technique is sanding. For big projects, you can use a sanding machine. For smaller objects, do it manually using sanding paper.
In sanding, we usually start with the rougher grade, moving to smoother ones. It is best done in circular motion, whether dry or wet.
Starting Your Epoxy Resin Project
1. Know your purpose and the right resin to choose
It is important to know what you want to create in order to choose the suitable type of epoxy resin. For example, the resin you will use to coat countertops won’t be the same as the one you can use with molds.
2. Prepare your working area
Working with resins can be messy, therefore, have a designated area so you don’t ruin objects around your home, like tables and floors. Try covering your working table and floor to prevent resins from sticking on the surface. You can try to cover it with polyethylene sheets, packing tape, or wax paper. But if there are instances when you can’t avoid dropping some resin on unwanted areas, you can use vinegar to clean the stain.
3. Prioritize safety
Since resins are made from chemical compounds, you need to handle them with utmost care. Before you start your resin art, wear protective gear like safety gloves so it won’t directly touch your skin, and wear a face mask if you have respiratory allergies to avoid inhaling dust particles and fumes.
Also, make sure that your working area is well ventilated, and children won’t be able to easily access it. Please always read and understand the instructions on the packaging and follow necessary precautions.
4. Molding

In certain projects like creating wood slaps, a special molding system is needed. Wood, plastic, acrylic, and plexiglass are common materials that are used to create molds. When you make a mold, make sure that it is tight, and leave no voids unsealed. Also, your mold has to be secure so that it doesn’t move or shift.

Epoxy does not stick to silicone, which is why silicone molds are a popular option to create different items and projects. Once the casted resin hardens, it can usually be removed easily. However, if it gets stuck, remove it with the help of a hot air dryer. But if the resin is still in its gel or liquid form, you can use isopropyl alcohol or vinegar to maintain your silicone mold in good condition.
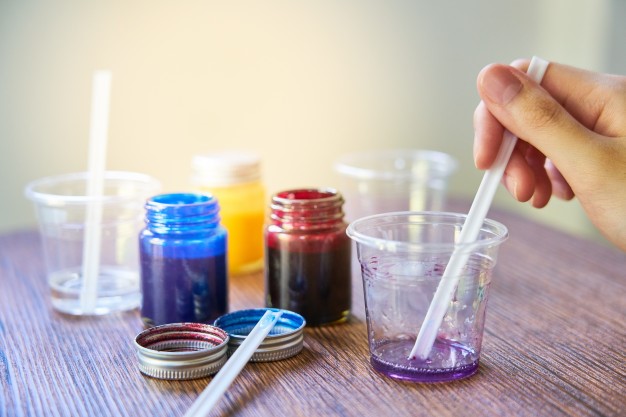
5. Mixing and pouring resin
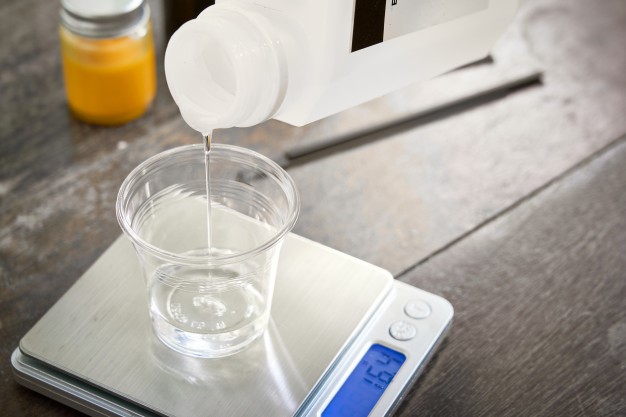
It is best to use paper cups and wooden sticks to mix your resin. You also need a scale or volumetric measuring cups for maximum accuracy and precision, otherwise you resin may not cure properly.
Mix component A and B according to the manufacturer instructions, while paying extra attention to the working time. You should mix in a circular manner at moderate-to-low speed to avoid forming bubbles. For pouring, if we need to coat or pour more than one layer, we need to know the re-working or re-coating interval time listed by the manufacturer.
6. Take time for your resin to cure
With some brands, curing takes several hours, while with others, it can take up to days. After pouring the resin mixture, make sure to take precautions to avoid dust, hair, or other contaminants sticking to it as it cures.
7. Demolding
While demolding silicone is easy, other molds can be more challenging. As such, we need to consider the demolding process when we make or choose the mold so as not to damage the final product.
Setbacks You Can Encounter in Epoxy Resin Making
In every project you will do, it’s normal to encounter setbacks. And there is a lot you will encounter when handling resin projects, here are some of them:
· Bubbles
You can’t avoid forming bubbles when mixing resin and hardener. But you have to remove them for a clear finish using a pressure pan or toothpicks (for really small items). Torches and heat guns are also good for removing bubbles. Hot water baths lessen bubbles as well, but they can affect and accelerate the curing time.
· Contaminants
If something gets stuck to the surface of your resin creation, you can sand it and then add a single coat of resin over the top.
· Resin stuck to mold
If the resin item got stuck in the silicone mold, you can remove it by heating the mold up using different methods such as a hair dryer, or by lowering its temperature by placing it in the freezer.
· Resin stuck on hand
Vinegar is a great remover for epoxy resin before it cures.
· White hazy resin
This problem usually happens due to high moisture in the air. If your project is multilayered, you can remove the hazy layer by sanding it, and reapplying resin.
FAQs
· Are Epoxy Resin Coatings Waterproof?
Resins are proven to be waterproof, which makes them a good option to use for coating and sealing since water can’t pass through. So, rest assured the crafts you will create from resin will be safe if you accidentally drop them in water.
But in the case of resin jewelry, since some might have attached metal clips, they should not be exposed to water because most metals are prone to rust.
· How Do You Avoid Getting Bubbles in Epoxy Resin?
There are many ways to avoid getting bubbles while crafting resin:
– Avoid shaking the component’s container before mixing.
– Try to avoid being shaky when mixing and pouring the mixture.
– Try to pre-warm the container of resin and hardener by placing them in warm water before using.
– When adding objects into the resin, try to seal each object you will use with a thin epoxy resin layer.
– If there are still bubbles, and it’s too difficult for you to remove them, try using a vacuum pump or a pressure pot.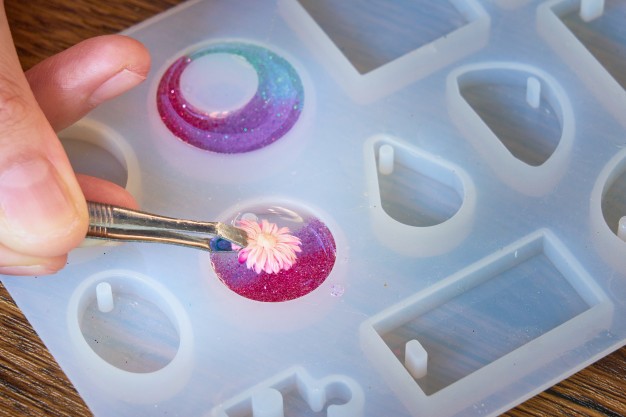
·
How Do You Remove Resin from Unwanted Areas?
Once softened, use a heat gun and set its temperature to 200 Celsius degrees. You will see the resin melt and turn to its liquid form again. And so, it will be easier to scrape it off the surface. [AMK1]
· Is It Safe to Use Jewelry Made from Resin?

After the curing process, the resin turns completely non-toxic, which means there are no substances in it anymore that can cause harm to your body once you wear it.
But if you want to be extra safe, you can try FDA approved types of resins as they are the safest.
· Do Resin Items Last Long?
You can rest assured that creating resin items is worth it since they can last longer than you expect. Resins are known to be durable against factors like water, scratches, or dropping on hard surfaces.
However, you should not be careless since there are still some things that can reduce the quality of resin objects and destroy them in the long run. Exposure to high temperatures can make resin creations lose their charm and some might turn yellowish. So, your resin pieces will last even longer if you take good care of them.


